Loading...
Loading...
Stella Montis is the crown jewel of ARC Raiders endgame content — a frozen underground research facility buried deep within a mountain, split across two distinct layers connected by elevator shafts and ventilation networks. The upper layer consists of abandoned laboratories, cryo-storage chambers, and administrative offices where mid-to-high-tier loot is spread across frost-coated corridors. The lower layer descends into excavated caverns and experimental weapon test chambers where the most valuable loot in the game spawns alongside the deadliest threats imaginable.
The two-layer design of Stella Montis creates a unique tactical dynamic. The upper facility is relatively navigable, with clearly marked corridors and moderate ARC presence from Sentinels, Shredders, and Hornets. The lower caverns, however, are a different world entirely. Natural cave formations create irregular geometry that makes navigation disorienting and combat chaotic. The experimental chambers glow with residual energy from pre-invasion weapons testing, and the ARC machines here are larger, more aggressive, and more numerous than anywhere else in the game. At the deepest point of the lower layer, Shredders — exclusive to Stella Montis — patrol alongside Bastions in deadly combinations, guarding caches of legendary-tier loot.
Surviving Stella Montis requires a fully equipped, well-coordinated squad with a clear plan. Ammunition, medical supplies, and extraction strategy must all be decided before entering. The extraction points are limited and often require fighting through dense ARC resistance to reach. The frozen environment also affects weapon performance, causing some firearms to jam more frequently. Only the most prepared and experienced players should attempt Stella Montis, but those who conquer it are rewarded with the best gear the game has to offer.
Primary extraction via the main freight elevator back to the surface. Requires power activation from the control panel nearby, which alerts every ARC machine in the sector.
A cramped vertical climb through the ventilation system exiting on the mountainside. Only one player can climb at a time, making squad extraction painfully slow.
Upper layer extraction through the cryo-storage laboratory. The frozen corridors slow movement, but ARC presence is lighter than other extract routes.
Emergency blast door on the lower level that leads to an underground tunnel system. Requires the Omega Keycard. The fastest extract if you have the key.
Narrow maintenance tunnel connecting the lower caverns to an exterior mountainside hatch. Long travel time but rarely contested since few players know about it.
The deepest chamber in the lower caverns where Shredders — exclusive to Stella Montis — patrol in force. The only map where Shredders spawn, guarding high-tier loot caches.
Experimental weapons lab in the lower level, glowing with residual energy. Top-tier weapon spawns and rare attachments, but Shredders and Bastions guard the area.
Sealed cryogenic storage facility requiring the Cryo Access Card. Contains frozen specimen containers with guaranteed epic and legendary crafting materials.
Upper-layer laboratory wing with intact research equipment. Workstations hold electronic components and rare data drives. Sentinel patrols are heavy here.
The main connection between upper and lower layers. Operating the elevator creates noise that attracts both ARC machines and players. Use with extreme caution.
An ice-encased observation deck overlooking the lower caverns. Provides a tactical view of the cavern floor but the glass panels offer no ballistic protection.
Advanced workbench in the facility engineering bay. Supports higher-tier crafting than standard workbenches. Located on the upper level near the elevator.
A natural cave converted into a biological research area. Containment pods line the walls, some still holding ARC specimens. Rich loot spawns but constant ARC aggression.

Tiny spider-like ARC machines that cling to walls and ceilings, waiting to ambush unsuspecting players. When a target passes below, they leap onto the head and detonate. Individually fragile but terrifying in dark interiors where they hide in clusters.

Small rolling explosive ARC balls that rush toward detected players and detonate on contact. Their spherical design allows them to roll at surprising speed across flat terrain. The explosion radius is larger than their tiny size would suggest.

The most common ARC enemy in the game. Wasps are basic flying drones armed with a rapid-fire gun that deals steady chip damage. They appear in nearly every encounter and are often the first ARC a new player faces.

Rolling flamethrower bots that patrol in groups and spray fire at close range. Fireballs are squat, ball-shaped machines with an extending flame nozzle. Their white-hot core is normally shielded but becomes exposed when they attack.

Scout drones (also known as Spotters) that fly at high altitude scanning for players. Snitches are not directly dangerous but their true threat is revealing your position to every other ARC in the area. Letting one live can turn a quiet looting run into a swarm fight.
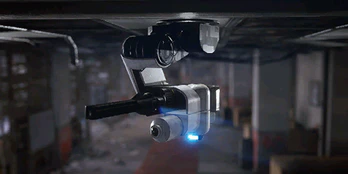
Flying ARC drones with electric shock attacks that stun players on hit. Hornets are semi-plated aerial units that hover aggressively and close distance to deliver debilitating electric discharges. Getting stunned by a Hornet in a firefight is often a death sentence.
Stationary gun emplacements found inside buildings and fortified positions. Turrets are unarmored and relatively fragile, but their rapid-fire output and placement at chokepoints make them surprisingly lethal to players who rush in without checking corners.

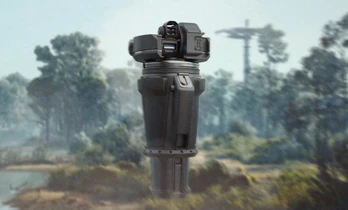
Heavy stationary sniper turrets usually found on rooftops and elevated positions. Sentinels deliver devastating long-range shots that can chunk most of a player's health in a single hit. Their distinctive yellow canister on the arm is their critical weak point.
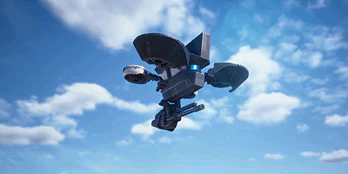
Heavy flying ARC enemies that fire devastating projectile attacks. Shredders are bulky aerial platforms exclusive to Stella Montis. Their aggressive attack patterns and airborne mobility make them one of the most dangerous medium-tier threats in the game.

Fully plated ball-shaped ARC machines that roll at high speed to crush players. Rollbots are heavily armored from all angles while in ball form, making them resistant to sustained fire. Their primary attack is simply rolling over you with tremendous force.

Siege-class 4-legged ARC tank with a massive turret mounted on top. Bastions are walking fortresses with heavy frontal armor and a powerful main cannon. They are among the most imposing non-boss enemies in the game and require focused team fire to bring down efficiently.
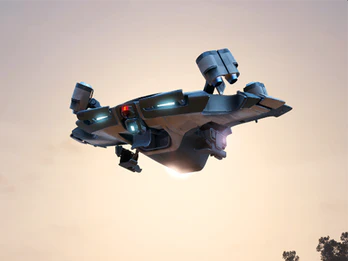
A terrifying aerial ARC machine introduced in the Flashpoint update. The Vaporizer combines the speed of a Rocketeer with a Matriarch-grade energy shield and precision laser attacks that will obliterate your shield and set you on fire in under two seconds. It patrols the airspace around ARC Operations and Close Scrutiny events. Killing it drops the Vaporizer Regulator required to craft the Dolabra energy shotgun.
An unarmed ARC machine with a powerful thruster system that regularly descends from orbit to collect air and soil samples. The Assessor is a large stationary ARC unit that lands during the Close Scrutiny ARC Operation. It does not roam — it holds a fixed position, surrounded by heavy ARC patrols including Vaporizers. While unarmed, breaching its 3 sections triggers deadly ARC reinforcement waves. Contains high-tier loot including ARC Powercells, ARC Alloy, ARC Circuitry, and the coveted Assessor Matrix.
Stella Montis is one of the extreme risk-difficulty zones in ARC Raiders, featuring 5 extraction points, 8 named POIs, and a Legendary-Tier loot tier. This is a high-stakes map — Raiders pushing this zone can pull top-tier weapons, augments, and crafting components, but the ARC patrols are denser and the rat traffic at extracts is brutal. Bring at least Medium shields, full ammo, and a teammate if you can.
The most reliable extraction routes on Stella Montis run through Facility Elevator, Emergency Ventilation Shaft, Cryo Lab Exit (and 2 other extracts depending on your spawn corridor). Extract camping is the single biggest threat on this map — file a bounty on our bounty board if a rat catches you at the loadout screen, since named extracts are predictable hot spots for ambushers. Prioritise running with weapons that match your engagement range: a mid-range workhorse weapon to handle ARC patrols efficiently. See our weapon tier list for current Nomadic Envoys patch 1.29.0 meta picks.
Notable POIs include Shredder Den, Weapons Test Chamber, Cryo-Storage Vault, Research Wing Alpha and 4 more landmarks scattered across the map — each one rotating between loot, ARC spawns, and PvP hotspots depending on the patrol cycle. Stella Montis hosts 13 confirmed ARC enemy types, including Tick, Pop, Wasp and 10 other variants. Check each enemy's weak points before you push — burning through a magazine on body shots is the fastest way to draw every rat in the zone.For real-time intel on rat activity, betrayer reports, and live danger zones, scan the community zone map before queueing in.
No active reports for this zone.